 If you live in Michigan, you know that we have thousands and thousands of gray and ugly fences everywhere. The problem is that wood fence cannot withstand the extreme temperatures of our state. People often think nothing can be done to make their gray and ugly fence look bright and beautiful for years to come, but there are many solutions. As the leading Michigan fence company, we have learned some things over the years. We hope our insights can help you and hundreds of home owners, housing complexes, businesses, and landlords/renters know how to turn the tide on the sea of ugly gray fences to something we can individually and publicly be proud about. An ugly gray fence can be a nagging concern and even an embarrassment. But a fence makeover, replacement and/or restoration project can be a permanent solution. A properly done fence makeover can make you proud when you drive up to your house, look out your windows, sit on your patio, and have family and friends over for a backyard BBQ, picnic, or a family party/event. Here are our helpful and proven tips that apply to a fence makeover and restoration project…
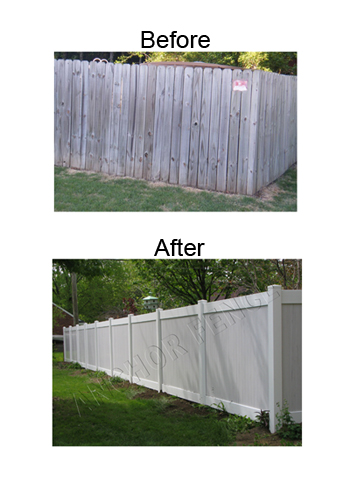
#1 – Replace rotting wood fence with a new vinyl fence that will last a lifetime
The prices of wood material has been increasing over the years, so much that a vinyl fence can cost the same amount as a wood fence, if not less. Unlike wood, vinyl fence will never rot or mold also most fence companies, including Anchor Fence have a lifetime warranty on vinyl material as opposed to wood material which normally comes with no warranty and does not hold up too well in Michigan weather.
#2 – Restore your wood fence Some fences, even those 15-30 years old can be made to look like new with a 2-3 day fence makeover restoration.
Years and even decades of gray/black mold, mildew, nail/screw black drip stains, and peeling paint, or old stain can be power washed away in one day on a typical fence!

#3 – Power wash the fence before you stain it.
Professional power washing (also known as pressure washing) will clean away years of gray/black mold, mildew, nail/screw black drip stains, peeling paint, and old stain. Stain will also more easily adhere to a fence that has been properly power washed. Power washing is very affordable to have done by a fence makeover and restoration company. But if you choose to do the power washing on your own, you should use a pressure washer machine with 3000 to 3600 psi. Smaller home model pressure washers normally will not have enough power to adequately clean the fence before it is stained. If you don’t have access to a commercial pressure washer, you can rent one from Home Depot or an equipment rental stores for usually under $100 per day.
WARNING: When using a pressure washer be extremely careful because it is easy to permanently damage your fence by putting noticeable cut marks into the wood. If the spray accidentally hits your hands, arms, legs, or feet you can also experience serious cutting injuries since the powerful spray will quickly cut through clothing and skin. Be sure to wear safety goggles because splinters and dirt can easily get into your eyes. Wear very old clothes when power washing because you will get caked with layers of black gunk. Also be sure to power wash using the 25 degree tip for your sprayer. Smaller tips will burn cut marks in your fence and larger tips will not adequately clean the fence in preparation for staining. If you have never done power washing before, be sure to practice on some old throw away boards to get a feel for it before starting on your fence.
#4 – Don’t use cleaning products on your wood fence.
There are a number of products on the market that promise great results to clean your wood fence. While some manufacturers may be unhappy with our experience, we have tried a number or products and not yet found anything that is worth the time, money, and hassle to use them. We have not yet found anything that works better than plain old fashion garden hose water coming through a commercial grace pressure washer to clean your fence and get it ready for staining. Fence cleaning products tend to be messy, add to your costs, are frustrating to apply, the chemicals can sometimes destroy the vegetation or grass around your fence, and frequently they just don’t work well. The only exception we have to this rule is that we do use a cleaning gel and scraper on fences that have old peeling paint. After the gel has been applied and the fence scraped, the power washing will get your fence ready for staining.
#5 – Be sure to check with your city or homeowners association about stain colors.
Some municipalities and homeowner associations have very specific restrictions on what color stain you can use on the fences in your neighborhood.
#6 – Don’t use a clear-coat finish, semi-transparent stains, paint, or poorly-rated solid stains.
When you use these type of products they will not cover over blemishes and nail/screw drip stains, variations in the old and new wood will be obvious, and normally the fence will only look good for a couple of years. This means that if you want a good looking fence you will need to spend the time, effort, and money to do it all over every 18 months to 3 years. Avoid using paint because over time paint will begin to peel in the high humidity and harsh winters of Michigan. Consumer Reports did a 3 year, 6 year, and 9 year study on fence and deck wood stain products and the hands down winner was Behr solid color wood stains for fences, decks, and siding. Many of the stains by other manufacturers didn’t even last 3 years. Behr stains provide quality, durable, and long-lasting results.
#7 – Work with your neighbors.
Many fences in Michigan are not stand along fences but instead are commonly shared fences with your surrounding neighbors. Work with your neighbors to avoid any disagreements on fence style, color and/or material.


